Tuesday, April 25, 2017

Five Favorite Recipes

Hey guys!

Today I'm sharing five of my fave recipes--three dinners, one app/snack, and one dessert.

I have been collecting recipes for the last couple years and have quite the collection. I get them from magazines, pinterest, websites, my mom, and now Blue Apron (will do a post on Blue Apron in the next couple weeks).  I have so many that I made four binders and divided them up by desserts, apps/snacks, breakfast/lunch/dinner, and mixed drinks (for entertaining). So here we go with some yummy recipes....

(links are in titles)


Power Nachos 

build-better-nacho


Ingredients
  • 1 teaspoon olive oil
  • 1 (15.5-oz) can cannellini beans, rinsed and drained, divided
  • 1 tablespoon cilantro leaves, finely chopped, plus leaves for garnish
  • 3 tablespoons fresh lime juice, divided
  • 1 rib celery, thinly sliced
  • 1/4 red onion, thinly sliced
  • 4 ounces multigrain tortilla chips
  • 4 ounces reduced-fat cheddar cheese, grated
  • 1/2 avocado, diced
  • Salsa (for serving)
Preparation


1. Preheat oven to 400°F.
2. In a medium bowl, mash the oil, 1 cup beans, chopped cilantro, and 2 TBSP lime juice. In another bowl, toss the celery, onion, 3/4 cup beans, and 1 TBSP lime juice.
3. Spread chips on a baking sheet; cover with the cheese. Bake until cheese melts.

4. Top the hot nachos with the bean mixtures, avocado, and salsa; garnish with cilantro leaves.
Recipe developed by Frances Boswell

These power nachos are so delicious! I crave this recipe. I could seriously eat this every day. I do change two things on this. Instead of cilantro, I use scallions and I don't use salsa. It's a light snack and much more healthy than your basic nacho recipe. You have to try this!

chicken cream cheese pillows with crescent rolls

Ingredients

8 ounces cream cheese, softened

1/2 cup sour cream

1/2 teaspoon salt

1/4 teaspoon pepper

1 1/2 tablespoons dried chives

1 1/2 tablespoons fresh onion minced

3 chicken breasts, cooked and diced (around 3 cups)

2 (8 ounce) cans Pillsbury crescent rolls

1/4 cup melted butter

Italian bread crumbs (around 2 cups)

Gravy:

1 (14.5 ounce) can cream of chicken soup

1 (0.87) package chicken gravy mix

water 


Instructions

1.  Preheat oven to 350 degrees.

2.  Using a hand mixer or by hand, beat cream cheese and sour cream until well combined. You can do this by hand if your cream cheese is soft enough. Stir in salt, pepper, onion, chives, and diced chicken.

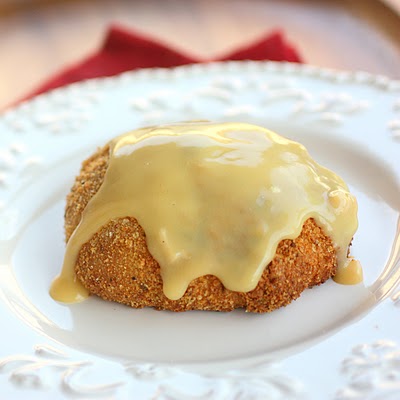
3.  Using Pillsbury crescent rolls, take 2 triangular rolls and push together at perforated seam to make into a square. Make sure you seal the perforations well so your filling doesn't come out. Put about 3 tablespoons of chicken mixture in the center of each square. Fold the dough corners to the center over the chicken mixture forming a pillow.

4.  Dip each pillow in melted butter on both sides. Roll in bread crumbs on both sides. Shake excess crumbs off. Place chicken pillow on cookie sheet and bake at 350 degrees for 20-25 minutes.

5.  Make gravy by mixing one package of chicken gravy mix, one can of cream of chicken soup and ¾ can of water in a small pot. Mix together and heat until warm. Serve chicken pillows with gravy poured over top.
Recipe from The Girl Who Ate Everything

I am obsessed with this recipe!! This is probably my favorite chicken recipe ever. I can easily eat two of these at one time if I wanted...but I don't. I always save one for lunch the next day so that I can savor it one more time. The prep takes a little bit but I believe it's totally worth it. 


Stuffed_French_Bread_Pinterest


INGREDIENTS
1 loaf french bread

1 pound lean ground beef

2 Tablespoons finely chopped onion

1/2 cup chopped celery

1 teaspoon minced garlic

1 can cream of mushroom soup

2 Tablespoons milk

2 teaspoons Worcestershire sauce

salt and pepper, to taste

1 1/2 cups shredded cheddar cheese

1/2 Tablespoon chopped parsley (optional)


INSTRUCTIONS

   Preheat oven to 350° F. Slice the french bread in half, lengthwise, so you have two equal pieces. Scoop out the bread in the center of each piece. Place bread in a large bowl and tear into small chunks. Set the two halves of french bread onto a large baking sheet. Set aside.

   Brown the ground beef and onion in a large skillet, over medium-high heat. Drain any grease. Add the celery and garlic to skillet. Cook a few minutes until celery is tender. Next, add soup, milk and Worcestershire sauce. Season with salt and pepper. Stir and cook mixture until heated; another 5 minutes or so.

   Add the beef mixture to the bread in the large bowl. Stir to combine. Pour mixture into the center of one half of the french bread. Spread out evenly. Top the mixture with the shredded cheese. Top with the other half of bread.

   Bake for 10 to 15 minutes, or until cheese is melted. Remove from oven and let stand 5 minutes before slicing and serving. Enjoy!

Recipe from Life in the Lofthouse 

This is a new recipe I recently found and I really enjoyed it. My boyfriend too! It's pretty easy to make and so yummy! I only changed one thing on this. Since my boyfriend and I don't like mushroom anything...I swapped out the cream of mushroom soup for cream of potato and it was excellent. Highly recommend! 


Fontina-Stuffed Pork Chops with Potatoes & Pizzaiola Sauce


  Ingredients 
  Instructions

   Wash and dry the fresh produce. Heat a medium pot of salted water to boiling on high. Quarter the potatoes lengthwise. Peel and thinly slice the shallot. Cut off and discard the stems of the peppers; remove and discard the ribs and seeds, keeping the peppers intact. Thinly slice the peppers into rings. Small dice the cheese (discarding any rind).

   Add the potatoes to the pot of boiling water. Cook 15 to 17 minutes, or until just tender when pierced with a fork. Drain thoroughly.

   While the potatoes cook, in a medium pan (nonstick, if you have one), heat 1 teaspoon of olive oil on medium-high until hot. Add the shallot and peppers; season with salt and pepper. Cook, stirring occasionally, 2 to 3 minutes, or until slightly softened. Add the tomato pastesugar and dried oregano; cook, stirring frequently, 1 to 2 minutes, or until the tomato paste is dark red and fragrant. Add the vinegar and 1/4 cup of water; season with salt and pepper. Cook, stirring occasionally, 1 to 2 minutes, or until thickened and saucy. Transfer to a bowl and season with salt and pepper to taste. Set aside in a warm place. Rinse and wipe out the pan.

   While the potatoes continue to cook, place the flour on a plate. Pat the pork chops dry with paper towels. Along the edge opposite the fat, carefully cut a horizontal slit nearly all the way through each pork chop, creating a “pocket.” Stuff with the cheese; press gently to flatten each pork chop. Season both sides of the stuffed pork chops with salt and pepper. Carefully coat the seasoned pork chops in the flour (tapping off any excess) and transfer to a separate plate.

   While the potatoes continue to cook, in the same pan, heat 2 teaspoons of olive oil on medium-high until hot. Add the coated pork chops and cook 4 to 6 minutes per side, or until browned and cooked through and the cheese has melted. Leaving any browned bits (or fond) in the pan, transfer to a plate and set aside in a warm place to rest for at least 5 minutes.

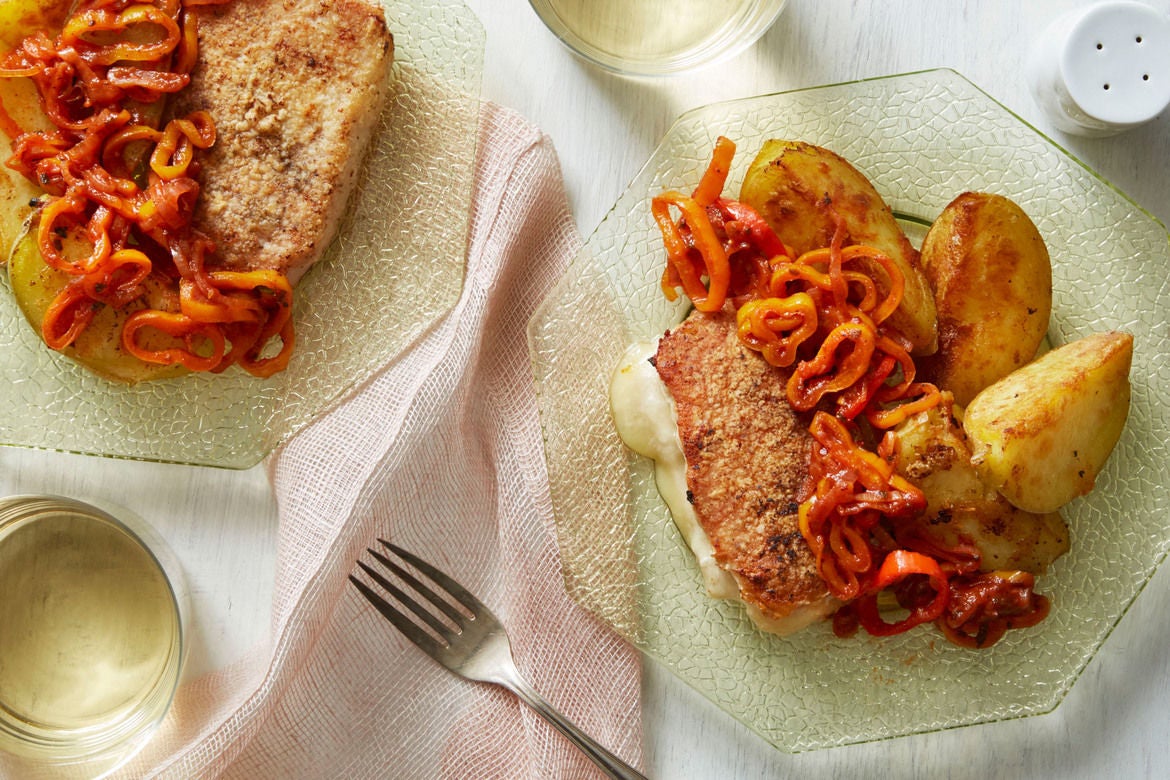
   While the pork chops rest, add the boiled potatoes, cut sides down, to the pan of reserved fond. (If the pan seems dry, add 1 teaspoon of olive oil.) Cook on medium-high 1 to 2 minutes on each cut side, or until browned. Turn off the heat. Season with salt and pepper to taste. Divide the rested pork chops and finished potatoes between 2 dishes. Top with the sauce. Enjoy!


Recipe from Blue Apron 

I recently tried Blue Apron and this was the first recipe we recieved. I won't get into too much detail about Blue Apron because I will do a separate post on them coming soon so stay tuned! This whole recipe was fantastic. Yes, it's a little time consuming so make sure you are not in a rush when you make this, but it is very much worth it. So good! 


Tres Leches (Milk Cake)

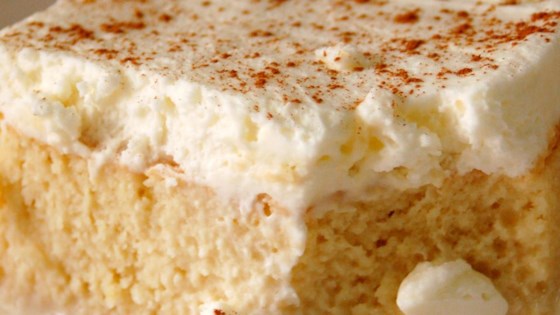
Picture from All Recipes

   Okay, so the recipe I have is from my mom. I'm not sure if she kinda made her own or what but it's slightly different than all the recipes I found under this title. I did link one up top with the slightly different recipe, but I am going to write out below the one I have and ate plenty of times! Another thing I noticed is that all the recipes include a topping and mine does not. That is your personal preference. I honestly don't think it needs any kind of topping so however you want to make it is fine. 

  Cake: 1 package (18.25 ounces) plain yellow cake mix
            1 package (3.4 ounces) vanilla instant pudding mix
            1 cup milk
            1 cup vegetable oil, such as canola, corn, or safflower
            4 large eggs

  Milk Syurp: 1 can (12 ounces) evaporated milk
                     1 can (14 ounces) sweetened condensed milk
                     1 cup heavy whipping cream
                     1 teaspoon pure vanilla extract

   Place a rack in the center of the oven and preheat the oven to 350. Butter a 13 x 9 inch baking pan. Set the pan aside.

   Place the cake mix, pudding mix, milk, oil, and eggs in a large mixing bowl. Blend with an electric mixer on low speed for 1 minute. Stop the machine and scrape down the sides of the bowl with a rubber spatula. Increase the mixer speed to medium and beat 2 minutes more, scraping the sides down again if needed. The batter should look well blended. Pour the batter into the prepared pan, smoothing it out with the rubber spatula. Place the pan in the oven.

   Bake the cake until it is golden brown and springs back when lightly pressed with your finger, 32-34 minutes. Remove the pan from the oven and place it on a wire rack to cool for 2 hours.

   When the cake has thoroughly cooled, pierce the top all over with the tines of a fork or a wooden skewer. The holes should completely cover the top.

   Prepare the syrup. Whisk together the evaporated and condensed milks, the cream, and vanilla in a medium bowl. Using a large spoon or ladle, spoon this milk syrup over the cake, letting it soak into the cake between spoonfuls. Continue spooning on syrup until all has been used.

   Cover the cake with plastic wrap and chill for 2 hours before serving. 


I am in loveeee with this recipe. I could easily eat half of this in one sitting! The cake is so moist and the fact that it's cold makes it even better. I can't describe why I love the taste of this so much but I'm addicted. 


And there ya have it! Let me know if you try any of these and what you thought!

Thanks so much for reading!

~Michelle 


Friday, April 21, 2017

Mother's Day Gift Ideas


Hey friends! Can you believe Mother's Day is a little more than three weeks away?! Time is flying by! I thought I'd put together some gift ideas to help ya out.

1. Beaches by Gray Malin ~ I want this book so bad!! I was fortunate enough to hear Gray Malin's story on how he became a photographer when I attended the Southern C Summit. He is definitely amazing. I think this would be the perfect gift for the beach loving mom! The first link is a little pricier because it's a signed collectors edition. If you can't afford that, the non-signed editions can be ordered here and here.

2. Bouqs Flowers ~ If you want to go the traditional route and order flowers, here is the place to do it. All of these bouquets are simply gorgeous. I want them all! You can choose by flower type or occasion. You can choose what size and whether or not you want a vase included.  You can even do a subscription if you want to order flowers for special occasions or just to have fresh flowers throughout the year.

3. Herbivore Botanicals-Coco Rose Coconut Oil Body Polish ~  Who doesn't want to smell like coconut?! If your mom loves indulging herself in the shower with scrubs, lotions, oils, etc., then you need to get this one! Everyone knows the benefits that coconut oil provides so it's no surprise that it's in many beauty products. This also contains Moroccan Rose which also has many benefits that fight aging and cellular damage. It's also ideal for sensitive skin. A win/win!

4. Marble & Copper Monogram Board ~ How beautiful is this board?! I love marble anything and thought how perfect this would be for a gift. Having it monogrammed adds that personal touch making it that more special. Each board is hand crafted so if you order more than one, know that they can look a little different.

5. Rebecca Minkoff Isobel Hobo Bag ~ If you're shopping around for a pricer item, this Rebecca Minkoff bag is simply gorgeous! It's perfect for spring in this soft blush color. If pink is not her thing, it comes in three other colors. It's roomy inside without being overly big. Just enough to stash all her essentials. She will be one stylish mom wearing this out!

6. Papyrus ~ I'm sure you have seen the name pop up when you are shopping for a card. If you haven't, let me introduce you to Papyrus! I have been buying their greeting cards for years now. I think they are all so beautiful and unique. It's so hard to choose just one! Right now through Sunday April 23rd, it is 25% off sitewide! The code is WEEKEND25. Exclusions may apply.

7. Michael Kors Activity Tracker ~ Would you believe that this was an activity tracker just by looking at it? It's gorgeous! I love how they made this to look like a bracelet. Perfect for the mom who is getting fit and wants to keep track of her steps. It can also track your sleep, goals, AND syncs to your phone! Read more here! I still can't believe it does all that by just looking at it. The best part....it's under $150!! How can you go wrong with that?? It also comes in gold and rose-gold and if this design doesn't work, there are a few more to choose from here.

8. Concourse Travel Pouch ~ If your mom is always on the go, then she needs this beautiful travel pouch for her necessities. The neutral color is so pretty but also comes in black. Mark & Graham always has beautiful things. They offer free monogramming and gift wrap on all orders! They also have a 2-in-1 cosmetic case that matches here! Another perfect gift!

9. GiGi New York Passport Case ~ Does your mom like to travel?? Then perhaps she needs this chic passport case. Another neutral color that will go with anything, but also comes in white and orchid. It is handcrafted and can be personalized. Under $75!

10. Deluxe Charcoal Antibacterial Bush Set ~ It's no secret that I love Sephora. I think they offer so much to women of all ages. So that is why these next three gifts are from there. Every woman that wears makeup needs a brush set. This set is perfect for those with sensitive skin. As it says in the title, the brushes have charcoal powder that have antimicrobial properties that help keep the brushes stay fresh longer. It comes with six essential brushes in a matching pouch. This is valued at $155 but you can get it for $62!

11. Sun Safety Kit ~ We all know how important it is to protect our skin from the sun. Well, this kit comes with 15!!! Yes, 15!! products from sunscreen, to self-tanner, to moisturizers. It all comes in a cute orange travel bag. This gift is perfect for anyone really, but if your mom loves looking youthful then she needs products to protect her skin! Are you ready for the best part....$32!!! How can you beat that price for 15 products?! It's limited edition so hurry before it sells out!!

12. Mini Happy Hands ~ Last but not least is this adorable hand cream kit. L'Occitane has some of the best lotion products! My hands and body always feel so smooth after applying. The scents are amazing as well! My fave is the almond one which is included in this pack. It comes with this cute green pouch. Very spring like! This is limited edition as well and for only $16 this will be sure to sell out fast!


Hope you guys have a wonderful weekend!

Thansk for reading!

~Michelle


Tuesday, April 18, 2017

GiGi New York Clutch


 Hey all!

Hope everyone had a wonderful Easter! We had some gorgeous weather and my boyfriend had the rare day off so we took advantage and went to Orient to the beach and looked for beach glass. 

Today, I'm talking about this gorgeous clutch from GiGi New York. I was obsessing over it for months and finally just bought it. I have neutral bags but didn't have a neutral clutch. I love the detail of the leather and gold hardware. The tassel on the zipper gives it that extra bit of glam. The color will go with anything. I also love the fact that it's not too small where you can't even fit a phone or keys in it. It's the perfect size! You can wear this with anything from casual clothing to dressed up for a wedding. As you can see, I wore it with a basic tee, jeans, and heels. 

So on the site, they still have this clutch but not in this color. Sorry! There are many other colors to choose from like this Almond one! They do have other style clutches that come in a more neutral like this one! I don't think you can go wrong with any one you choose. They are all beautiful! Been eyeing up some other bags for Spring as well! 

Thanks for reading!!

~Michelle


Sunday, April 9, 2017

Kissbobo Strapless Bra


Hello ladies! 

Hope everyone had a great week and an even better weekend! We finally had some nice weather here.  I've been dying to get outside. I have a 5k coming up in June and need to get my butt walking again! I got to catch up on some more cleaning and organizing of the house. Finally got my mirrored dresser in and could not be more in love! I have been obsessed with mirrored furniture for months now. It won't work throughout our house because we are doing a nautical/coastal theme (we live by the water) but for my dressing room I wanted to glam it up a bit and was able to get at least one piece! I just have to change the knobs though. I wanted diamond ones instead of the ones it comes with, but that's an easy fix. 

Now, moving on to something more intimate. How many times have you bought a strapless bra only to have it fall down throughout the day? I definitely have! I have bought many over the years at different places and was even measured for them. Each time I came in explaining that my current one was falling down, I was told I didn't have the right size. So I would get the new one and it would do the same thing. I would constantly have to pull it up all the time. How embarrasing is that?! It felt hopeless that I would find one that would fit and stay in place. Enter: Kissbobo  (also here)

As you can see it came in the box in it's own little pouch and booklet with instructions. There are videos you can watch that demonstrate how to put the self adhesive bra on. There are different styles you can select and can even get it in black. I was a little nervous at first because I worried that it would unstick or fall out of my top! Let me tell you...it stayed all day!! I was so impressed. I was even doing a lot throughout the day such as cleaning the house and lifting boxes. As you can see it is strapless and backless. That will come in very handy this summer with lots of dresses and tops. I am definitely excited to finally have a strapless bra that stays put, looks natural, and is affordable! If you have tried this or plan on trying it, let me know what you think! 

Kissbobo self adhesive strapless bra c/o

Buy here and here

Thanks for stopping by!

~Michelle 


*Thank you to Kissbobo for the product! 

**All opinions are my own.

Monday, April 3, 2017

Fresh Fusions


Hey guys! Hope you all had a wonderful weekend! It was finally nice out--not cold--no rain--so I was able to take some overdue pictures for the blog. 

Today I wanted to talk about this fantastic water bottle I ordered from Amazon. I am obsessing over it! The Fresh Fusions water bottle has this chamber inside that you put fruit in. You then pour the water in and it washes over the fruit. Letting it sit for 2-3 hours is the minimum recommendation and letting it sit overnight really sets the flavor. It comes in six different colors! I got the emerald as you can see. It's easy to use and also easy to take apart and clean.

When you order, you also receive the book of recipes. To clarify, you receive it in an email. I prefer having a hard copy in my kitchen so I printed it out instead. The booklet is loaded with facts and so many recipes. The first one I tried was the strawberry and lemon which was delicious. Next, I'm trying the raspberry and apple and then blueberry and lemon! Yum! It was so good and got me to drink more water. To be honest before this, I could only drink water that was ice cold (i freeze my waters) and would find it difficult to drink a whole bottle just because it has no flavor. I am one of those people that cannot drink plain water when eating food so I would have to force myself to drink water the rest of the time. Now that it's flavored with real fruit, it makes it very easy to drink more because I actually crave it! I love that I can take this anywhere I go. Whether I'm at work or running errands, this will be by my side. There's a lock on the lid so that it doesn't open up in case it falls over. It also comes with the matching sleeve to keep it cool. I love that it's big enough to put ice cubes in it when I want to chill it a little more. I'm so excited to go through all the recipes! The best part....it's under $15! This is a must buy!!

p.s. Isn't this a great gift to get someone?!

Fresh Fusions water bottle 


If anyone has this or decides to try it out, let me know what you think in the comments!

Thanks for stopping by!!

~Michelle


*This post was not sponsored nor was this product gifted to me. I bought this on my own and opinions are 100% my own. I just really love this product!